![Image result for apple iPhone X meme]()
This is going to be a series of blog posts due to the limited amount of free time I have to allocate to the proper research and writing of an all-inclusive blog post on iOS 11. More work is needed to make sure nothing drastic is missing or different and to dive deeper into the artifacts that others have reported to me as currently being unsupported by tools.
From what I have seen thus far, I am relieved that iOS 11 artifacts look very similar to iOS 10. This is good news for forensicators who see iOS devices and have adapted to the challenges that iOS 10 brought. Prior to writing this, I was referred to a blog post on iOS 11, that was an interesting read (thanks Mike). I suggest you also check it out as it pinpoints what is new in iOS 11 in regards to features: https://arstechnica.com/gadgets/2017/09/ios-11-thoroughly-reviewed/5/
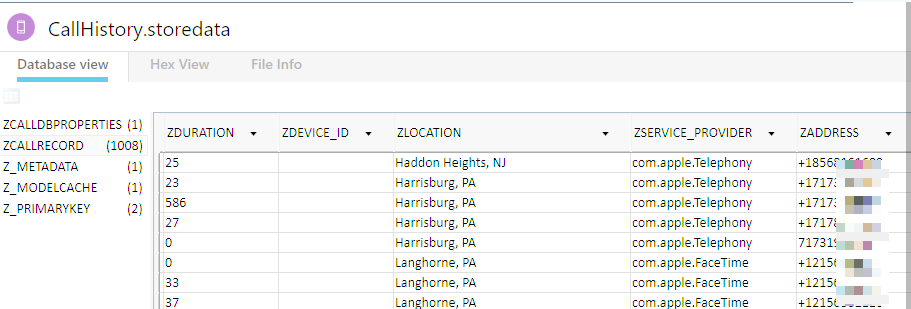
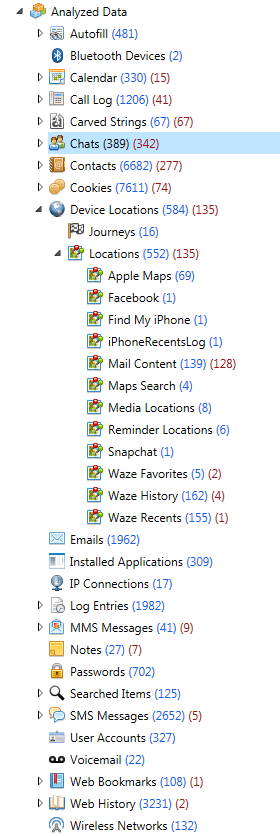
Understanding what the OS is capable of doing helps us determine what we need to look for from a forensic standpoint. From what I have seen so far, the major artifact paths have not changed for iOS 11. Key artifacts for normal phone usage appear to be in the same locations:
- Contacts- /private/var/mobile/Library/AddressBook/AddressBook.sqlitedb
- Calls-/private/var/mobile/Library/CallHistoryDB/CallHistory.storedata
- SMS – /private/var/mobile/Library/sms.db
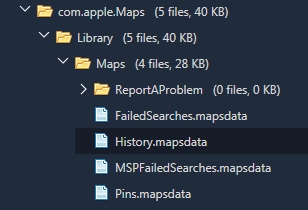
- Maps – /private/var/mobile/Applications/com.apple.Maps/Library/Maps/History.mapsdata – Still missing? Refer to my blog post from Dec.
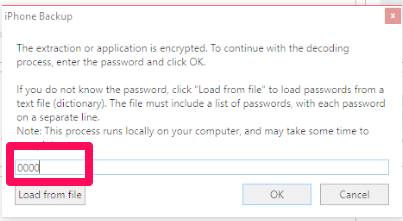
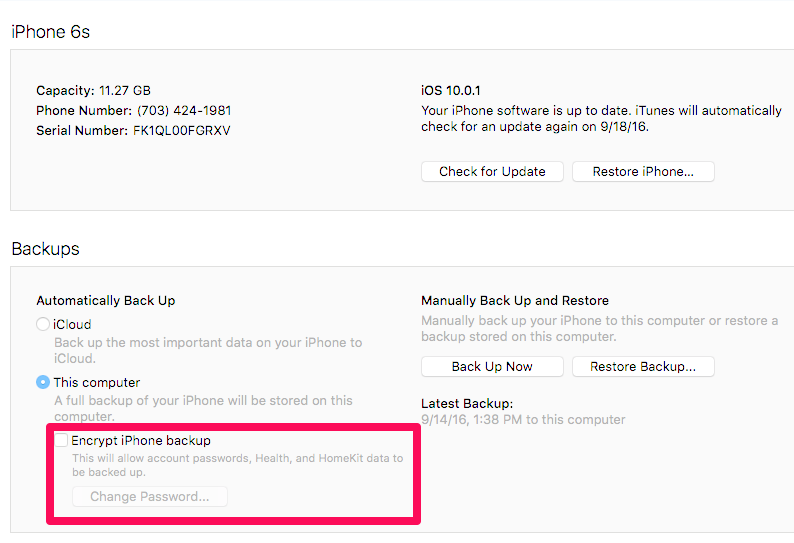
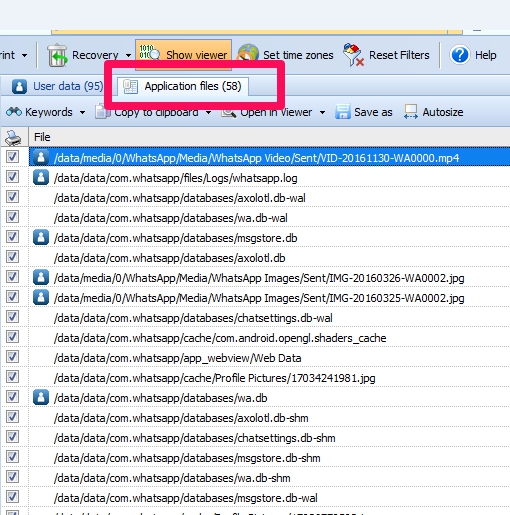
When I test an update to a smarphone OS, I normally start with basic user activity (create a new contact, place some calls, send messages, ask for directions, etc.) and then I dump my phone and see what the tools can do. For this test, I created both encrypted and unencrypted iTunes backups, used PA Methods 1 and 2 and did a logical extraction with Oxygen Detective. What I found is that not all tools parsed the data in the same manner, which is to be expected. (I also plan to test more methods and tools as time allows and for my FOR585 course updates.)
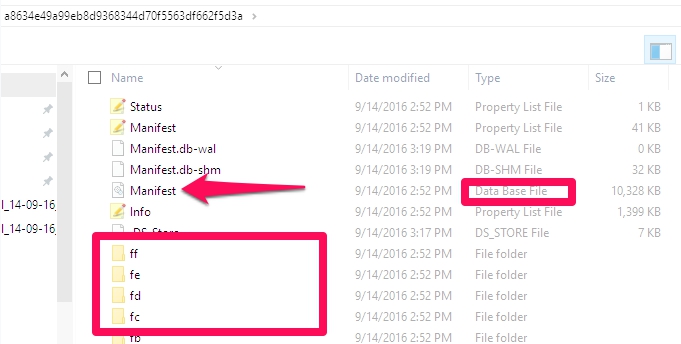
To get this post done in a timely manner, I found one item that has always been parsed and jumped out as “missing” or not completely supported.
![]()
iMessages and SMS in iOS 11 were the first items that jumped out as “something is off…” and I was right. I sent test messages and could not locate them in the tools as easily as I have done in the past. I normally sort by date, because I know when I send something. Up until this release of iOS, we could rely on our tools to parse the sms.db and parse it well. The tools consistently parsed the message, to/from, timestamps, attachments and even deleted messages from this database. Things have changed with iOS11 and it doesn’t seem that our tools have caught up yet, at least not to the same level they were parsing older iOS versions.
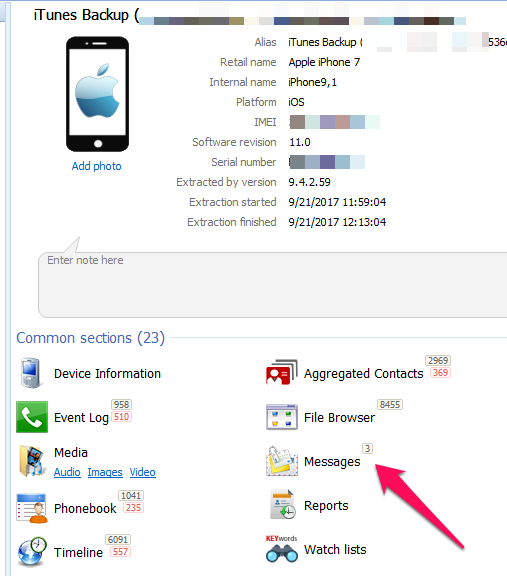
One of the most frustrating things I find is that the tools need access to different dumps in order to parse the data (as correctly as it could for this version). For example, Oxygen didn’t provide access to the sms.db for manual parsing, nor did it parse it for examination when the tools was provided and iTunes backup. This had nothing to do with encryption, because the passcode was known and was provided. UFED isn’t the same as PA Method 1 and 2 (you have heard this from me before), but it’s confusing because most don’t know the difference. This is what it looked like when I imported the iOS 11 backup into Oxygen. Believe me, there are more than 3 SMS/iMessages on my iPhone.
![]()
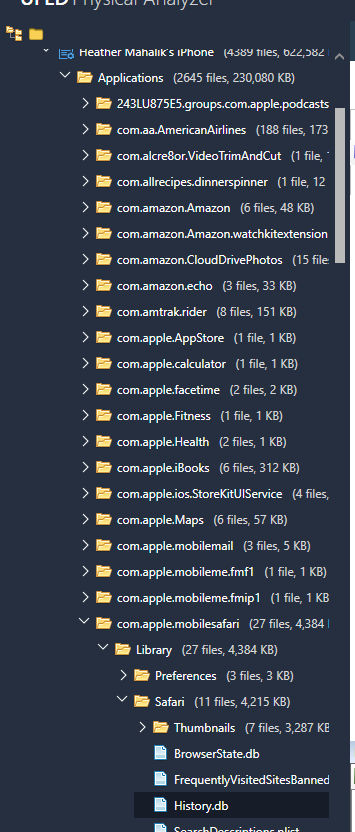
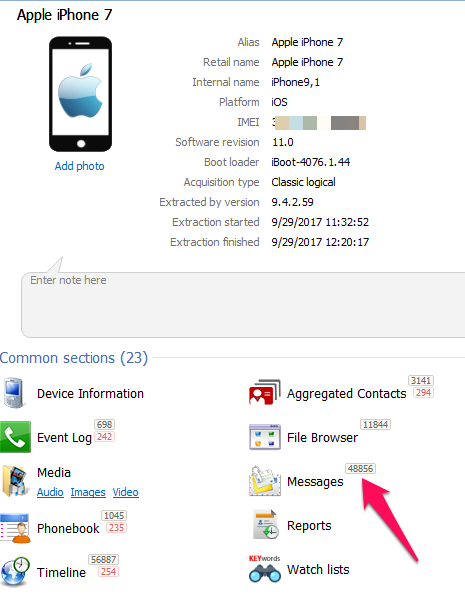
However, I when I dumped my iPhone logically using Oxygen Detective, it parsed the SMS and provided access to the sms.db. When I say “parsed” the sms.db, I am not referring to timestamp issues at all, those will be addressed in a bit. Here is what my device looked like when I dumped it and parsed it in Oxygen.
![]()
Spot the differences in the messages? Yep, you now see 48,853 more! Crazy… all because the data was extracted a different way. I also tested adding in the PA, Method 1 image and those message numbers were different, but the sms.db was available and parsed. You really have to dump these devices in different ways to get the data!
Bottom line – add the sms.db to something you need to manually examine for iOS 11 to ensure your tool is grabbing everything and parsing it. The rest of this blog is going to focus on just that – parsing the sms.db in regards to changes found in iOS 11.
Let’s take a look at what is the same (comparing iOS 11 to iOS 10):
- SMS and iMessages are still stored in the sms.db
- Multiple tables in this database are required for parsing/joining the messages correctly
What is different (comparing iOS 11 to iOS 10):
- Additional tables appear to be used?
- The timestamp is different for iOS 11 – SOMETIMES!
Here is what I found (so far). The tools are hit or miss. Some tools are parsing the data, but storing the messages in a different location, others are parsing the message content, but not the timestamp… you catch my drift… What I recommend? Go straight to the database and take a look to make sure the tool(s) you rely on are not missing or misinterpreting the messages (wait… didn’t I just say that – YES, I did.)
Thetimestamp fields for the sms.db are all over the place now. What I am seeing is that the length of the Mac Absolute value varies between two formats and both of these formats can be stored in the same column. This is why the tools are struggling to parse these dates. Additionally, the tables in the sms.db differ in how they are storing the timestamp. So, if your tool is parsing it correctly, excellent – but still take a look at the tables.
Here are some examples of what this mess looks like. The column below is from the chat table in the sms.db. Notice how it has the traditional Mac Absolute value ( number of seconds since 01/01/2001), while others are a 19 digit Mac Absolute values and some are 0 (sent messages).
![]()
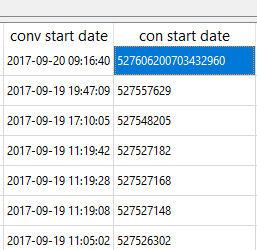
Additionally, I was seeing some that were 19 digits that were not appended with 00s at the end. The “conv start date” on the left column is from the messages table in sms.db and this timestamp has not changed. As expected, your tools handle this one nicely. The table on the right column is from the chat_message_join table, and this caused a little havoc as well due to the variety of timestamps in the column. Converting this wasn’t fun! Thanks Lee for your help here. You, my friend, ROCK!
![]()
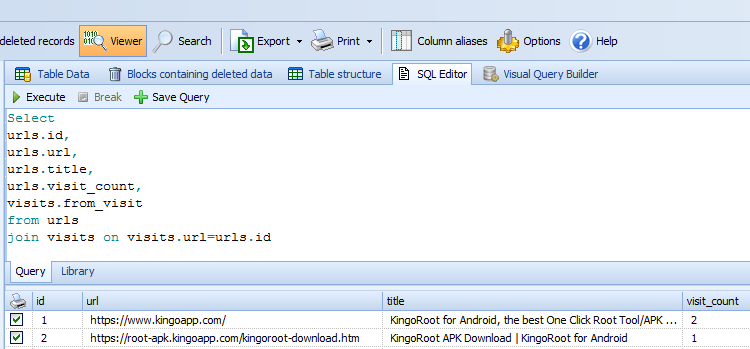
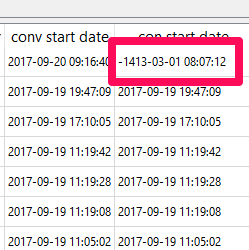
When I first ran my SQL query, I noticed this one pesky date that wasn’t converting. This is because it was the timestamp highlighted above and I needed to beef up my query to handle this. If you see a date that looks like the one below, something is up and you aren’t asking for the data to be rendered correctly. The query below will handle this for you.
![]()
Don’t believe me that this causes issues yet, take a look at how it looked in one tool.
![]()
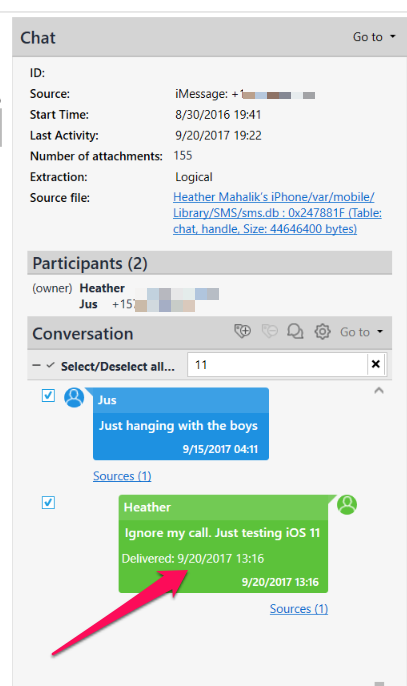
The dates and times are not parsed correctly. I found that the dates and times appear to be consistent when the tools are parsing the 9 digit Mac Absolute timestamps from specific tables. Otherwise, expect to have to do this yourself. Here is where it was correct, but this wasn’t the case for all of my messages sent using iOS 11.
![]()
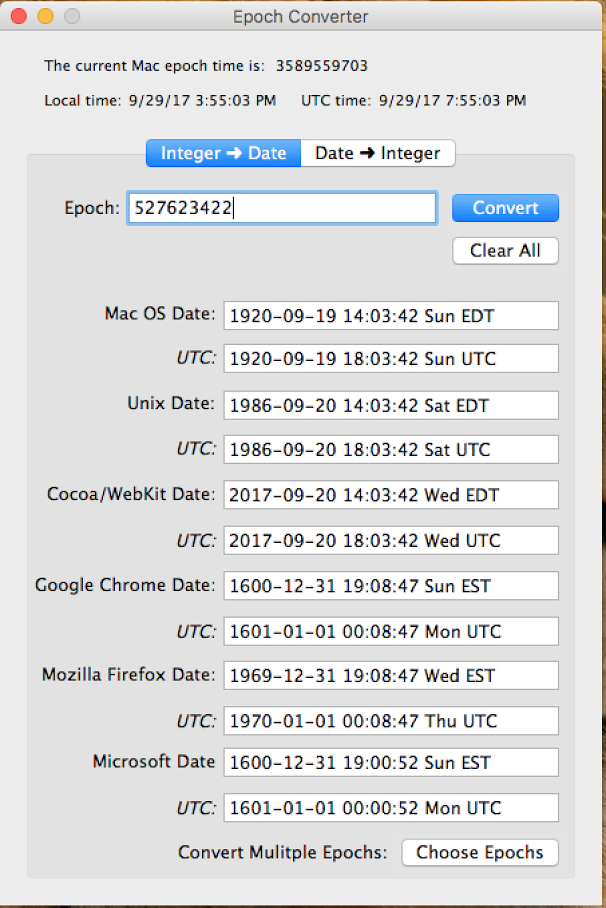
If you need a sanity check, I always like to use the Epoch Converter that I got for free from BlackBag to make sure I am not losing my mind when dealing with these timestamps. Below, you can see it was parsing it correctly (Cocoa/Webkit Date). Also, I love that it gives you both localtime and UTC.
![]()
This leads me to the good news -below is the query that will handle this for you. This query is a beast and “should” parse all sms and iMessages from the sms.db REGARDLESS of the iOS version, but only columns that I deemed interesting. (Note that I state should, because this has only been run across a few databases and you should report any issues back to me so they can be fixed.) Take this query and copy and paste it into your tool of choice. Here, I used the DB Browser for SQLite because it’s free. I limited some columns to the ones I care about the most, so you should make sure this query isn’t missing any columns that may be relevant to your investigation.
SELECT
message.rowid,
chat_message_join.chat_id,
message.handle_id,
message.text,
message.service,
message.account,
chat.account_login,
chat.chat_identifier AS “Other Party”,
datetime(message.date/1000000000 + 978307200,’unixepoch’,’localtime’) AS “conv start date”,
case when LENGTH(chat_message_join.message_date)=18 then
datetime(chat_message_join.message_date/1000000000+978307200,’unixepoch’,’localtime’)
when LENGTH(chat_message_join.message_date)=9 then
datetime(chat_message_join.message_date +978307200,’unixepoch’,’localtime’)
else ‘N/A’
END AS “conversation start date”,
datetime(message.date_read + 978307200,’unixepoch’,’localtime’) AS “date read”,
message.is_read AS “1=Incoming, 0=Outgoing”,
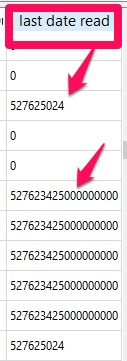
case when LENGTH(chat.last_read_message_timestamp)=18 then
datetime(chat.last_read_message_timestamp/1000000000+978307200,’unixepoch’,’localtime’)
when LENGTH(chat.last_read_message_timestamp)=9 then
datetime(chat.last_read_message_timestamp +978307200,’unixepoch’,’localtime’)
else ‘N/A’
END AS “last date read”,
attachment.filename,
attachment.created_date,
attachment.mime_type,
attachment.total_bytes
FROM
message
left join chat_message_join on chat_message_join.message_id=message.ROWID
left join chat on chat.ROWID=chat_message_join.chat_id
left join attachment on attachment.ROWID=chat_message_join.chat_id
order by message.date_read desc
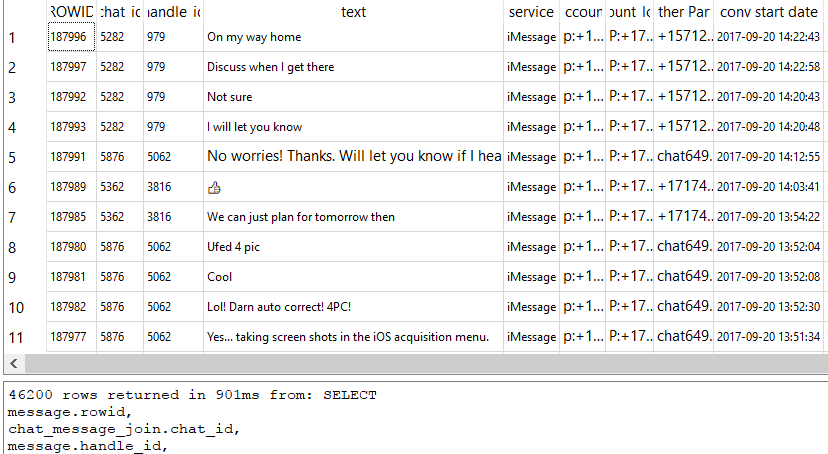
Here is a snippet of what this beauty looks like. (Note: this screenshot was taken prior to me joining attachments – aka MMS).
![]()
I always stress that you cannot rely on the tools to be perfect. They are great and they get us to a certain point, but then you have to be ready to roll up your sleeves and dive in.
What’s next – applications, the image/video files that apparently aren’t parsing correctly, interesting datbases andplists new to iOS 11 and the pesky maps. That one is still driving me crazy! Stay tuned for more iOS 11 blogs and an upcoming one on Android 7 and 8.
Thanks to Lee, Tony, Mike and Sarah for keeping me sane, sending reference material, testing stuff and helping me sort these timestamps out. Like parenting, sometimes forensicating “takes a village” too.
![Image result for keep charging forward meme]()


 I applied and interviewed with several Government agencies and Police Departments. Nobody would hire a grad with no experience and the Forensic degree was a new thing. I was one of the first 4 with this degree in the United States. This makes me feel old…

 Plus, who doesn’t have a phone? May as well learn how to forensicate it.


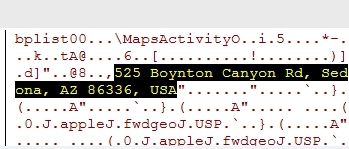
 This post is brought to you thanks to a FOR585 Advanced Smartphone Forensic alumni who could not locate an artifact he learned about in class. This artifact is tied to Apple Maps on iOS devices. The file of interest is the GeoHistory.mapsdata, which was introduced with iOS 8 and has been tracking the Apple Maps data since. This file replaced the legacy history.mapsdata file. This file was required for examination in his case. When he couldn’t find it, he reached out and sent me on a frenzy of testing. Since his question arrived in my inbox, I have been obsessed with figuring out what the “Grinch” did with it.


 I applied and interviewed with several Government agencies and Police Departments. Nobody would hire a grad with no experience and the Forensic degree was a new thing. I was one of the first 4 with this degree in the United States. This makes me feel old…
 Plus, who doesn’t have a phone? May as well learn how to forensicate it.